
Cake time again – and back to making Birthday cakes! I have a very good family friend who is very found of Chocolate fingers…so making a chocolate finger inspired cake was a very easy choice!

The cakey bit – Sponge
Ingredients:
- 175g self-raising flour
- 1tsp baking powder
- 175g butter, plus extra for greasing
- 175g caster sugar
- 3 eggs
- 1tsp vanilla flavoring
Step One:
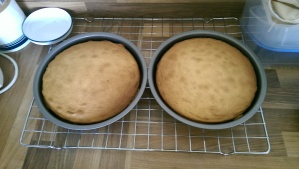
Preheat the oven to 180 degrees and grease/line two 20cm sandwich tins.
Step Two:
Mix the flour, baking powder, butter, caster sugar, vanilla and eggs into a bowl – this needs to be mixed really well until smooth (I recommend a big mixing bowl, there’s quite a lot of mixture). I actually used duck eggs for this cake, after seeing some friends at the weekend who are rather overwhelmed by their ducks egg producing skills. They are amazing for baking and made the mixture a fantastic yellow!
Step Three:
Separate the mixture evenly out into the two tins. Bake in the oven for 25-30mins or until well risen and golden brown.
Step Four:
Leave to cool in the tins for about 5 mins before transferring onto a cooling rack!
Main cake done…moving on…
Filling time – orange butter cream
Ingredients:
- 70g butter
- 140g icing sugar
- 1tsp orange flavouring
Step One:
Thoroughly mix all of the ingredients together to form a nice smooth but thick mixture, you can add more icing sugar if its too runny.
Step Two:
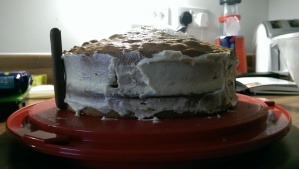
Spread some of the mixture over the top of one of the cakes so its fully covered, this forms the filling in the middle of the cake – you can use as much as you want here, as its so easy to make you can always make more for the later steps…
Decorating time – Chocolate Fingers and Smarties…
Ingredients (if you can really call them that)
- 3 boxes of chocolate fingers
- 5 boxes of smarties (I only used 4, hence the sprinkles in the middle)
- Butter cream from above
Step One:
Smooth out the butter cream around the edge of the cake making sure there is a good coverage, this will stick the chocolate fingers onto the side of the cake! Then cover the top with the remaining butter cream, you may or may not have to make more depending on how much you use.
Step Two:
Start placing the chocolate fingers on the cake, one by one, side by side. If using a 20cm baking tin you’ll need about 2&1/2 boxes of chocolate fingers.

Step Three:
Quite simply – arrange the smarties on top of the cake, this can be done how you want, sideways or flat (note: sideways will required a few more boxes)
And thats that! Done – a very tasty chocolate finger smartie cake!
Enjoy! Cx
